MrElectrifyer
Member

- A tech enthusiast mindset
- A system that meets the Windows 10 Technical Preview minimum requirements:
- A partition that is NOT BitLocker Encrypted. If you want to have the VHD in your main C:/ drive, it should NOT be BitLocker Encrypted, otherwise, you’ll keep getting an error message saying something is wrong with your computer whenever you attempt booting from the VHD.
- Windows 10 Technical Preview ISO (duh), officially available here.
- If you’re running any version of Windows earlier than Windows 8, you’ll require a standalone ISO virtual disc drive application, like Free ISO Mount, officially available here.
- GImageX (an ImageX GUI), officially available here.
- A system that meets the Windows 10 Technical Preview minimum requirements:
o Processor: 1 gigahertz (GHz) or faster
o RAM: 1 gigabyte (GB) (32-bit) or 2 GB (64-bit)
o Free hard disk space: 16 GB
o Graphics card: Microsoft DirectX 9 graphics device with WDDM driver
For the sake of putting it into perspective of how backwards compatible Windows 10 is, my 2007 pre-built Gateway desktop, which came with XP, meets these minimum system requirements (never upgraded its parts).o RAM: 1 gigabyte (GB) (32-bit) or 2 GB (64-bit)
o Free hard disk space: 16 GB
o Graphics card: Microsoft DirectX 9 graphics device with WDDM driver
- A partition that is NOT BitLocker Encrypted. If you want to have the VHD in your main C:/ drive, it should NOT be BitLocker Encrypted, otherwise, you’ll keep getting an error message saying something is wrong with your computer whenever you attempt booting from the VHD.
- Windows 10 Technical Preview ISO (duh), officially available here.
- If you’re running any version of Windows earlier than Windows 8, you’ll require a standalone ISO virtual disc drive application, like Free ISO Mount, officially available here.
- GImageX (an ImageX GUI), officially available here.
Now perform the following 10 steps, including their sub-steps where applicable:
1.) If you’re running any version of Windows earlier than Windows 8, install Free ISO Mount (or your heart desired ISO virtual disc drive application).
2.) Create a VHD by carrying out the following sub-steps

6.) Extract the contents of the downloaded GImageX zip file from the prerequisites and launch the appropriate version of GImageX (depending on your OS bit version, in my case, the x64 version); the GImageX v2 GUI should pop-up.
7.) Determine and keep note of the index # of the Windows 10 Technical Preview image you want by carrying out the following sub-steps

2.) Create a VHD by carrying out the following sub-steps
a. Open the “Run” dialog by pressing Win+R, type in “diskmgmt.msc” (A) and click the “OK” button (B); the “Disk Management” GUI will pop-up.

b. Click the “Action” menu (A) and select “Create VHD” (B); the “Create and Attach Virtual Hard Disk” GUI will pop-up.

c. Browse to the location you want to store the VHD at (A), enter an appropriate VHD size in MB/GB (B, I entered 30 GB = 30720 MB), select “VHD” format (C), select “Fixed size (Recommended)” VHD type (D), and click the “OK” button (E); the unallocated VHD will be created.

3.) Initialize the VHD by carrying out the following sub-stepsb. Click the “Action” menu (A) and select “Create VHD” (B); the “Create and Attach Virtual Hard Disk” GUI will pop-up.
c. Browse to the location you want to store the VHD at (A), enter an appropriate VHD size in MB/GB (B, I entered 30 GB = 30720 MB), select “VHD” format (C), select “Fixed size (Recommended)” VHD type (D), and click the “OK” button (E); the unallocated VHD will be created.
a. Scroll down to your newly created VHD (it’ll be completely “Unallocated”), right-click on the “Disk #” info to the left (A), select “Initialize Disk” (B); the “Initialize Disk” GUI will pop-up.

b. Select the “MBR (Master Boot Record)” partition style (A), click the “OK” button (B); the VHD will be initialized.

4.) Format the VHD by carrying out the following sub-stepsb. Select the “MBR (Master Boot Record)” partition style (A), click the “OK” button (B); the VHD will be initialized.
a. Right-click on the “Unallocated” black bar to the right of your VHD’s “Disk #” info (A), select “New Simple Volume…” (B); the “New Simple Volume Wizard” GUI will pop-up.

b. Click “Next”, confirm that you’re formatting the entire available disk space and click “Next”. Assign your VHD a desired drive letter, keep note of it (I used T), and click “Next”. Ensure you’re formatting your VHD volume to the “NTFS” file system (A), give your VHD a volume label (B, I used Windows X), ensure the “Perform quick format” checkbox is checked (C), and click the “Next” button. Click “Finish”, and your VHD will be formatted, now you can close the “Disk Management” window.

5.) Mount the Windows 10 Technical Preview ISO to a virtual disc drive; simply double-click on it in File Explorer on Windows 8 and later, or use the appropriate steps of the virtual disc drive application you installed during step 1.) above. Regardless how you do it, you should be able to see the contents of the ISO file as shown below. Note the drive letter of the virtual disc drive (A, in my case, it’s D)b. Click “Next”, confirm that you’re formatting the entire available disk space and click “Next”. Assign your VHD a desired drive letter, keep note of it (I used T), and click “Next”. Ensure you’re formatting your VHD volume to the “NTFS” file system (A), give your VHD a volume label (B, I used Windows X), ensure the “Perform quick format” checkbox is checked (C), and click the “Next” button. Click “Finish”, and your VHD will be formatted, now you can close the “Disk Management” window.
6.) Extract the contents of the downloaded GImageX zip file from the prerequisites and launch the appropriate version of GImageX (depending on your OS bit version, in my case, the x64 version); the GImageX v2 GUI should pop-up.
7.) Determine and keep note of the index # of the Windows 10 Technical Preview image you want by carrying out the following sub-steps
a. In the GImageX v2 GUI, click the “Info” tab (A), click the “Browse…” button (B), navigate to the “<Virtual Disc Drive’s Drive Letter from Step 5.) Above>\sources” directory (C), open the “install.wim” file (D), and click the “Get Info” button (E); the GImageX v2 GUI would display a list of image indexes in the ISO.

b. Keep note of the image index of the Windows 10 Technical Preview image you want (A), in my case, I wanted the “Professional” version (B), so, I kept note of Image Index: 1.

8.) Apply the Windows 10 Technical Preview image to your VHD by carrying out the following sub-stepsb. Keep note of the image index of the Windows 10 Technical Preview image you want (A), in my case, I wanted the “Professional” version (B), so, I kept note of Image Index: 1.
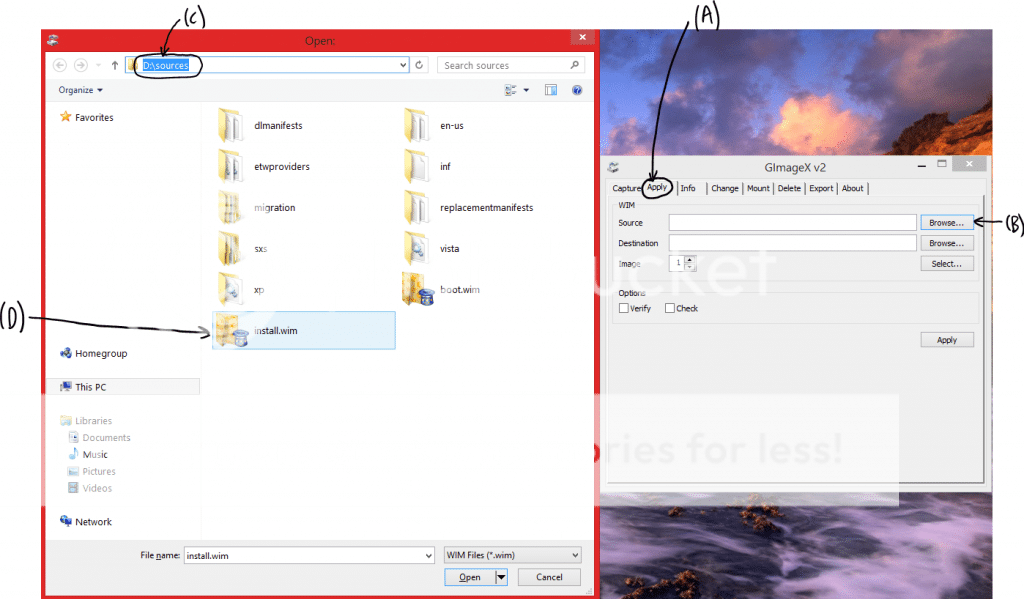
a. In the GImageX v2 GUI, click the “Apply” tab (A), click the “Browse…” button besides the “Source” text-box (B), navigate to the “<Virtual Disc Drive’s Drive Letter from Step 5.) Above>\sources” directory (C), and open the “install.wim” file (D).

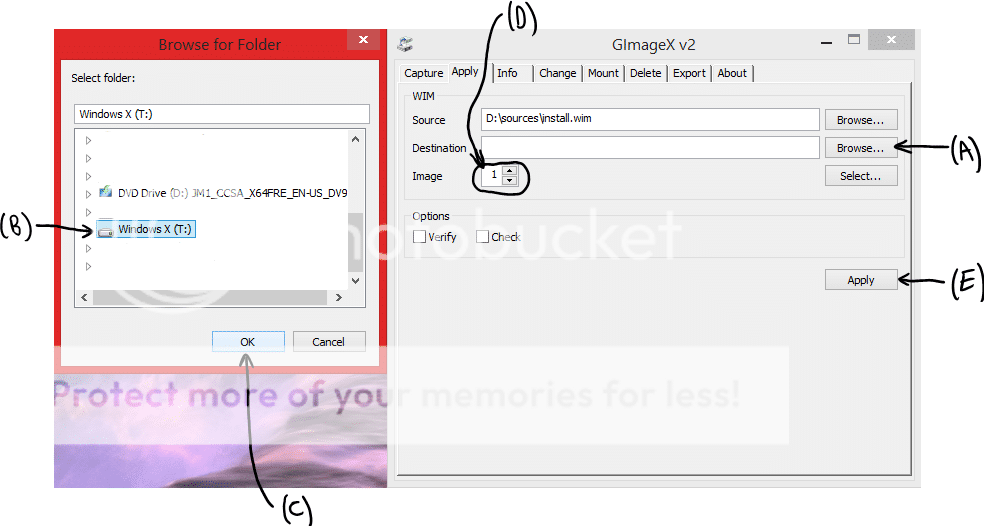
b. Click the “Browse…” button besides the “Destination” text-box (A), select your VHD file at the desired drive letter you used in step 4b.) above (B, remember I used T), click OK (C), select the image index of the Windows 10 Technical Preview image you kept note of in step 7b.) above (D, remember I kept note of Image Index: 1) and click the “Apply” button (E); GImageX would begin applying the Windows 10 Technical Preview image to your VHD…be patient, took 5m33s to apply it in my case...once complete, click the “Close” button and exit the GImageX GUI.

9.) Make your VHD file bootable by performing the following sub-steps
b. Click the “Browse…” button besides the “Destination” text-box (A), select your VHD file at the desired drive letter you used in step 4b.) above (B, remember I used T), click OK (C), select the image index of the Windows 10 Technical Preview image you kept note of in step 7b.) above (D, remember I kept note of Image Index: 1) and click the “Apply” button (E); GImageX would begin applying the Windows 10 Technical Preview image to your VHD…be patient, took 5m33s to apply it in my case...once complete, click the “Close” button and exit the GImageX GUI.

a. Open an administrative command prompt by searching in your start menu/screen for “Command Prompt”, right-click it and select “Run as administrator”.
b. In the command prompt, type in the following command, replacing T with the desired drive letter you used in step 4b.) above, and hit Enter:
c. The above command also sets your VHD to be the default boot source. If you like that, skip to step 10.) below. Otherwise, to change that, type “msconfig” without the quotes and hit Enter; the “System Configuration” GUI will pop-up.
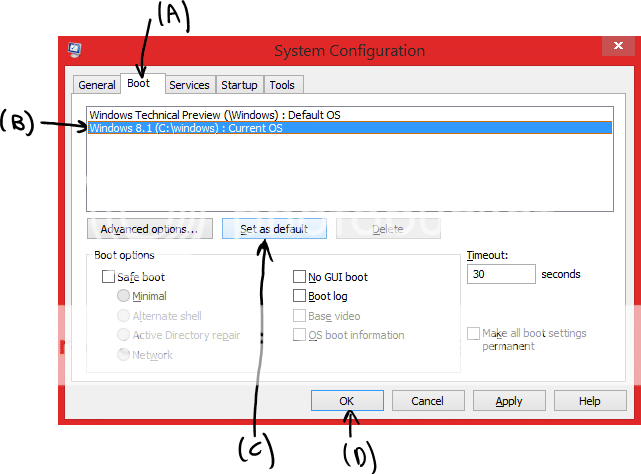
d. Click the “Boot” tab (A), select the OS entry which you want to make the default (B), click the “Set as default” button (C), and click the “OK” button (D).

10.) Vuala, you can now close everything, restart, and boot into the Windows 10 Technical Preview and try it out, all from on a VHD file. Whenever you’re done, simply boot back into Windows 8.1/8/7 (whichever you originally had as your OS) and delete the VHD file from your SSD/HDD to regain the space b. In the command prompt, type in the following command, replacing T with the desired drive letter you used in step 4b.) above, and hit Enter:
c:\Windows\system32\bcdboot T:\Windows
Once the command finishes running, you should get the following message:Boot files successfully created.
c. The above command also sets your VHD to be the default boot source. If you like that, skip to step 10.) below. Otherwise, to change that, type “msconfig” without the quotes and hit Enter; the “System Configuration” GUI will pop-up.
d. Click the “Boot” tab (A), select the OS entry which you want to make the default (B), click the “Set as default” button (C), and click the “OK” button (D).

Last edited:
