PavtubeVideo
New Member
The 1080i designation is 1,920x1,080 pixels, running at 30 frames per second. You may find many camcorders record videos in 1080i. With 1080i, it's getting half a snapshot every 60th of a second (1,920x540 every 60th).
Here this post is mainly talking about how to put 1080i videos onto Micorsoft Surface RT/Pro tablet for playback. First of all, you should know, the camcorder recorded 1080i videos have large size, and the formats may incompatible with Surface RT/Pro tablets. Thus, in order to play 1080i videos on Surface, you need to use a video converter to transcode 1080i videos for Surface RT/Pro. The following, i will use Pavtube Video converter to show you how to converting 1080i videos for Surface RT/Pro.
In advance, please download and install the 1080i to Surface converter (Mac) on your PC. Mac users please use the Mac 1080i to Surface converter. Now, just read the steps to operate the professional video conversion software.
Step 1. Run the Surface Video Converter and load your source 1080i video files into it.
After you launch this app, you need to load your source files. To do this, you can click “+” icon to import your source files, or click “File -> Add Video/Audio or Add from folder”.

Step 2. Set output format and customize output settings.
If you want to select the optimized preset for Surface, you can click the format icon in the “Output Format” pane, open the drop-down format list, and then go to “Format -> Windows > Microsoft Surface Windows RT H.264 Video (*.mp4)” to use it.

Meanwhile, you may press “Settings” and change the audio/video parameters. The task info shows estimated sizes of each file. Generally the lower bitrate you use, the smaller the output video is, and the less space it takes.
Step 3. Start to convert 1080i videos to Surface RT/Pro.
Hit “Convert” to convert 1080i files to Microsoft Surface. When the conversion is over, an “Open” option will be available. You can directly hit it to find the output files. And then, you can sync the output files to Surface. If you have no idea about how to transfer meida files to Surface, click the link to learn it.
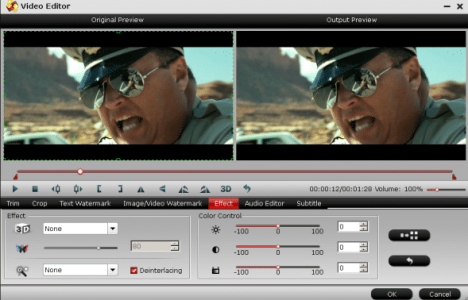
By the way, if you need to remove interlace for the media file, just click on "Edit", you will see a Video Editor panel where you are able to easily edit your 1080i HD video by using several powerful editing functions. Click on "Effect" tab, and check the deinterlace option.

Here this post is mainly talking about how to put 1080i videos onto Micorsoft Surface RT/Pro tablet for playback. First of all, you should know, the camcorder recorded 1080i videos have large size, and the formats may incompatible with Surface RT/Pro tablets. Thus, in order to play 1080i videos on Surface, you need to use a video converter to transcode 1080i videos for Surface RT/Pro. The following, i will use Pavtube Video converter to show you how to converting 1080i videos for Surface RT/Pro.
In advance, please download and install the 1080i to Surface converter (Mac) on your PC. Mac users please use the Mac 1080i to Surface converter. Now, just read the steps to operate the professional video conversion software.
Step 1. Run the Surface Video Converter and load your source 1080i video files into it.
After you launch this app, you need to load your source files. To do this, you can click “+” icon to import your source files, or click “File -> Add Video/Audio or Add from folder”.

Step 2. Set output format and customize output settings.
If you want to select the optimized preset for Surface, you can click the format icon in the “Output Format” pane, open the drop-down format list, and then go to “Format -> Windows > Microsoft Surface Windows RT H.264 Video (*.mp4)” to use it.

Meanwhile, you may press “Settings” and change the audio/video parameters. The task info shows estimated sizes of each file. Generally the lower bitrate you use, the smaller the output video is, and the less space it takes.
Step 3. Start to convert 1080i videos to Surface RT/Pro.
Hit “Convert” to convert 1080i files to Microsoft Surface. When the conversion is over, an “Open” option will be available. You can directly hit it to find the output files. And then, you can sync the output files to Surface. If you have no idea about how to transfer meida files to Surface, click the link to learn it.
By the way, if you need to remove interlace for the media file, just click on "Edit", you will see a Video Editor panel where you are able to easily edit your 1080i HD video by using several powerful editing functions. Click on "Effect" tab, and check the deinterlace option.

